Data Engineering Components: Docker Explained
Why Docker?
Imagine you have developed a shopping web application, including a React-based frontend, a Python + Flask backend, and a PostgreSQL database, and you want to deploy it in a production environment.
How do you do it? You might follow a long list of instructions to deploy each service separately.
But in the coding world, no one likes doing tedious, repetitive tasks—who wants to set up the same deployment process over and over again?
This is where Docker comes in.
With Docker, you can package your code and all the necessary configuration and dependencies into a single “box.” You can then produce multiple replicas of this “box” and easily deploy them wherever needed, streamlining the whole process, which brings lots of portability to the development and deployment process.
Actually, the “box” here is the “container.” Before diving into Docker, we will first discuss containerization and virtualization—the foundations upon which Docker relies.
Virtualization and Containerization
Note: This part is based on my personal understanding of the following videos: Virtualization Explained, Containers vs VMs: What’s the difference?, What is a Hypervisor?, Containerization Explained, Virtual Machine (VM) vs Docker
Virtualization is the process of creating a virtual version of a computing resource.
- It can happen at the hardware level. For example, the cloud services we use do not offer us a dedicated physical server, but rather a virtual machine.
- It can also work at the operating system level. For instance, Docker allocates compute resources from the operating system to separate environments (containers) where our applications run.
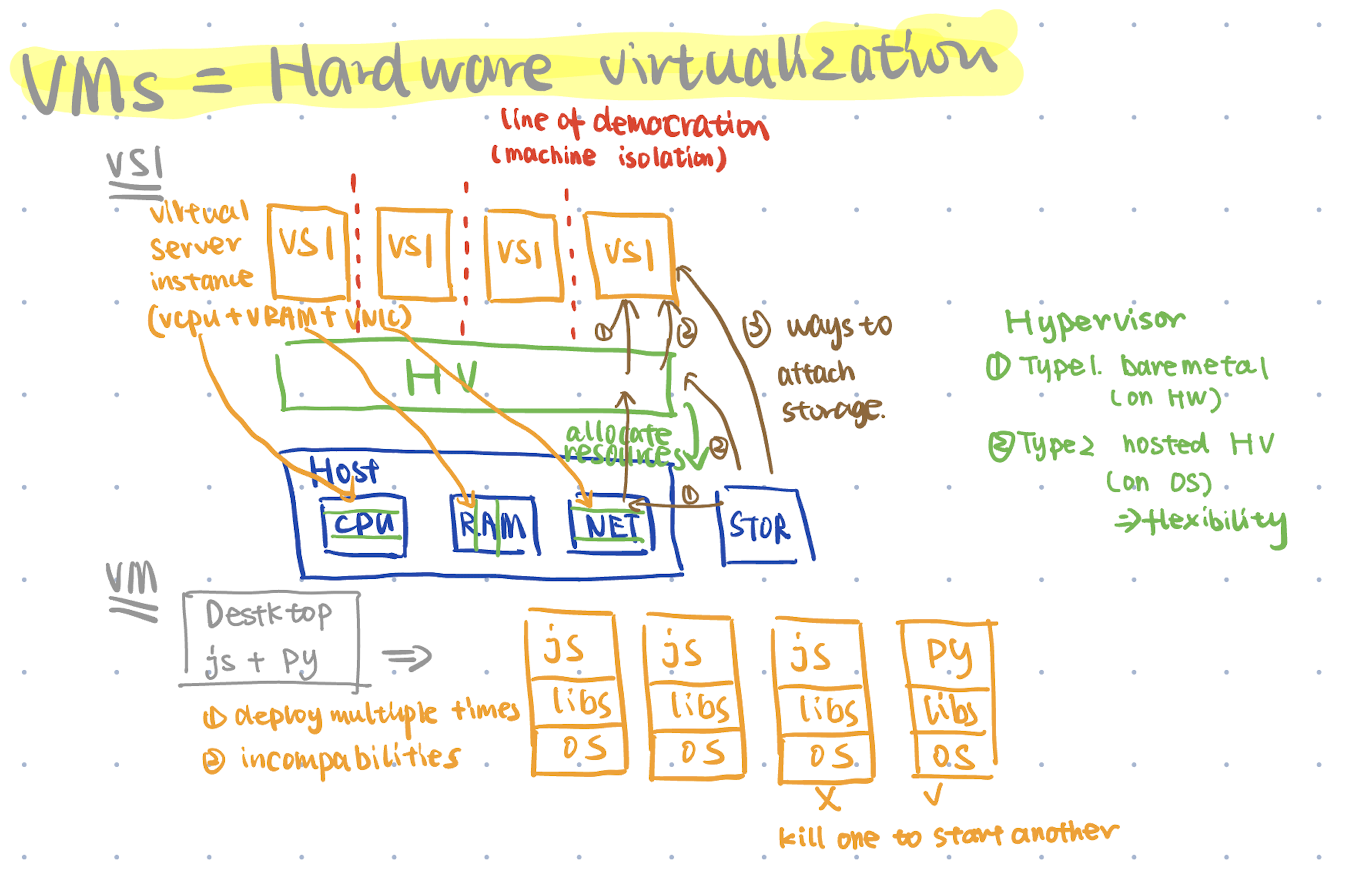
Hardware Virtualization: Virtual Machine
As we know, with cloud services—take Amazon Web Services (AWS) as an example—when we launch a compute instance (such as EC2, Elastic Compute Cloud), we don’t actually own a physical server in a data center. Instead, AWS uses virtualization technology to create a virtual machine (VM) instance for us.
AWS uses a kind of “super brain” (for EC2, this is mainly the Nitro Hypervisor) to manage the CPU, RAM, and network on the physical host server, and then allocates these resources to different virtual machines. Each VM has its own virtual CPU (vCPU), virtual RAM (vRAM), and virtual network interface (vNIC), and the management layer ensures that these machines remain isolated from one another.
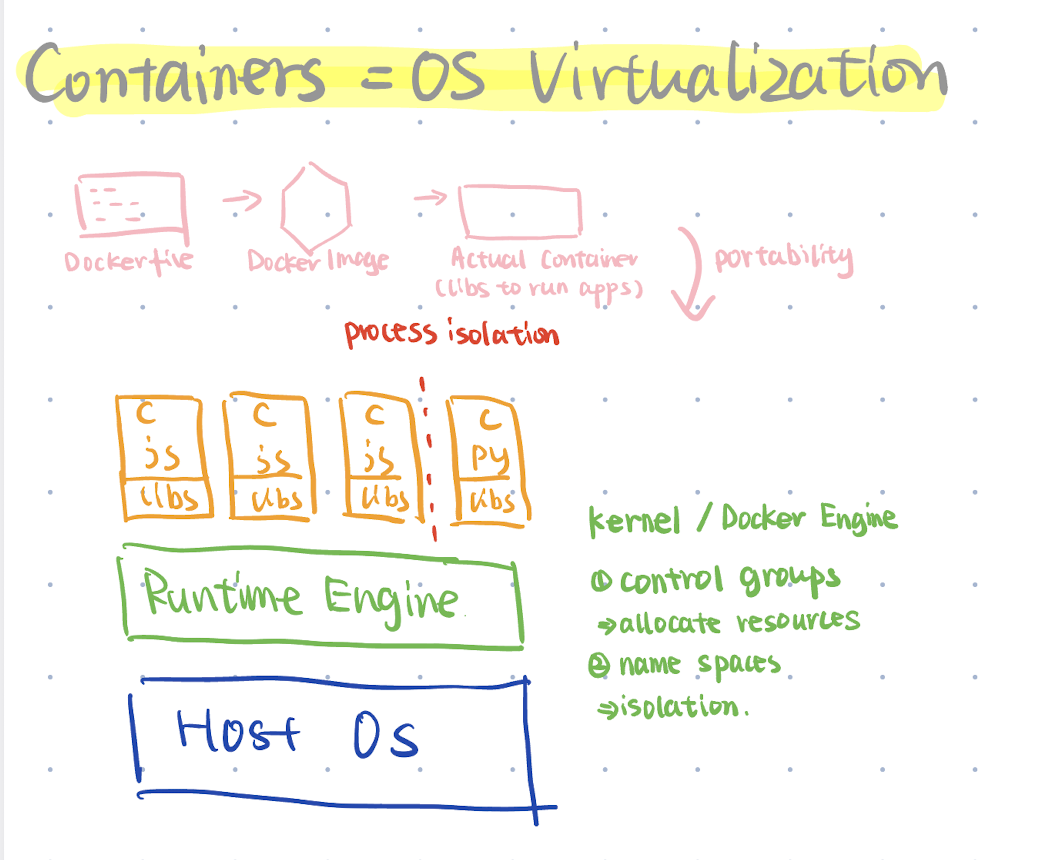
Operating System Virtualization: Containerization
Virtualization operates at the hardware level by allocating physical resources to each machine. Now, let’s move inside to the operating system level.
To better understand, consider a real-life example: iOS runs on our iPhone, and it also uses a sort of “super brain” to manage applications. In this case, each application is isolated from the others and runs in its own separate environment.
Of course, the benefits of Docker extend beyond simple isolation and running on a single OS.
When deploying multiple applications across different platforms and environments, we want to ensure consistency in configuration and content.
In the Docker context, the “super brain” is the Docker Engine. It is responsible for packaging everything you need into a single container and allocating resources from the operating system (rather than directly from the physical server) to run your container.
Docker Architecture and Key Components
To better understand Docker, let’s use coins as an analogy.
Imagine you want to produce many 1-euro coins. To do this, you need a mold. However, to create a proper 1-euro mold, you must follow specific instructions (or you might end up with a mold for 50-cent coins).
In the Docker world, if you want a portable “coin” (a Docker container), you first need a “mold” (a Docker image) that allows you to rapidly produce containers at scale. To create this mold, you use a set of specific instructions (a Dockerfile).
To summarize:
- Dockerfiles: Instructions for creating Docker images.
- Images: Lightweight, standalone, executable packages. These images can be stored in repositories, allowing for rapid deployment. For example, pulling a PostgreSQL image lets you quickly run a local PostgreSQL instance.
- Containers: Instances of Docker images that contain your application. Each container is isolated from the others.
Additionally, just as a coin factory requires someone to manage the entire production process, Docker relies on a “super brain” called the Docker Engine.
Running in the background, the Docker Engine relies on the Docker daemon to leverage Linux kernel features—control groups (cgroups) and namespaces—to manage container lifecycles and more.
More specifically:
- Control Groups (cgroups): Allocate and limit resources among processes.
- Namespaces: Provide isolation by separating processes into distinct environments.
Hands-on Docker
How to Run and Stop a Container?
After installing Docker on your local environment, you can run docker run hello-worldin your terminal. This command will display the following message describing how Docker works:
Hello from Docker!
This message shows that your installation appears to be working correctly.

To generate this message, Docker took the following steps:
 1. The Docker client contacted the Docker daemon.
 2. The Docker daemon pulled the "hello-world" image from Docker Hub.
    (arm64v8)
 3. The Docker daemon created a new container from that image which runs the
    executable that produces the output you are currently reading.
 4. The Docker daemon streamed that output to the Docker client, which sent it to your terminal.
When you type the docker run hello-worldcommand, Docker pulls the image called hello-worldfrom the repository and creates a container from it in your environment.
Here are some additional Docker run command options that I find useful:
--name <name>: Specifies the name of the container.-d, --detach: Runs the container in the background, so it doesn’t occupy your terminal.-v <source>:<destination>, --volume: Mounts a host directory or volume into the container.- For example,
docker run -d -v ~/workspace/datasets:/data dataservicemounts the content of the host folder~/workspace/datasetsto the container’s/datadirectory. This is especially useful for persisting data, such as when launching a PostgreSQL database.
- For example,
-it: -i stands for standard input, and -t stands for TTY (teletypewriter, which originally referred to devices used to interact with computers and is now used for terminal interfaces). When used together, they provide you with an interactive session inside the container.- It’s like when you type python in your terminal and enter an interactive Python environment. Similarly, adding
-itwhen running a Python container gives you the same interactive behavior.
- It’s like when you type python in your terminal and enter an interactive Python environment. Similarly, adding
After launching several containers, you might not need one of them. Here are some steps you can use:
- First, use
docker ps(which shows the process status) ordocker container ls(which lists containers) to display the containers you are running. The first column shows the container ID. - Then, use
docker stop <container_id>to stop a specific container.
For more information, refer to the Docker container run and Docker container stop documentation.
How to Interact with a Docker Container
Launching a PostgreSQL Docker Container
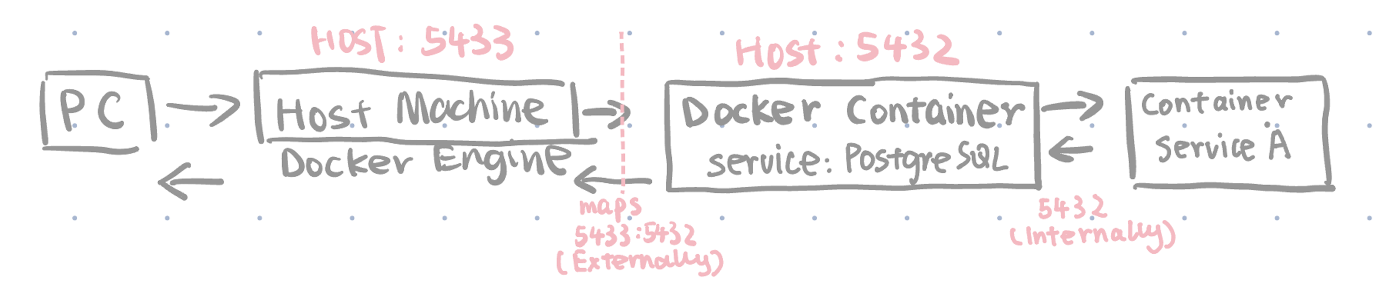
Let’s take a PostgreSQL database containing NYC taxi data from DE Zoomcamp as an example. When running a command like this:
docker run -it \
  -e POSTGRES_USER="root" \
  -e POSTGRES_PASSWORD="root" \
  -e POSTGRES_DB="ny_taxi" \
  -v "$(pwd)/ny_taxi_postgres_data:/var/lib/postgresql/data" \
  -p 5433:5432 \
  postgres:13
This command instructs the Docker engine to pull the image named postgres:13from the repository, and the -itflag creates an interactive session for PostgreSQL.
In detail, the -voption mounts a host directory (in this case, $(pwd)/ny_taxi_postgres_data) to the container’s /var/lib/postgresql/datadirectory, ensuring that your data persists outside the container’s lifecycle. The -eoptions set the environment variables required to configure PostgreSQL.
Specifically, the -p <host_port>:<container_port>flag maps the ports. When using -p 5433:5432, PostgreSQL is exposed on port 5433 on the host machine. When you access the PostgreSQL container from your PC, you use port 5433, and Docker forwards the requests to port 5432 inside the container, where PostgreSQL is listening.
Accessing the PostgreSQL Docker Container
After launching the PostgreSQL Docker container, you can connect to the PostgreSQL service by running the following command (assuming you’ve installed psql ):
psql -h localhost -p 5433 -U root -d ny_taxi
This command connects you to the PostgreSQL service. It is similar to connecting to a PostgreSQL service running locally, except that this instance is running in a virtual environment created by Docker.
We can compare this to the normal process for setting up the same PostgreSQL database without using Docker:
### Normal Process
# Install the PostgreSQL service
brew install postgresql

# Set the data directory
initdb -D "$(pwd)/ny_taxi_postgres_data" -U root --auth=password

# Launch the PostgreSQL service
pg_ctl -D "$(pwd)/ny_taxi_postgres_data" -l "$(pwd)/ny_taxi_postgres_data/logfile" start

# Create the database
psql -h localhost -p 5433 -U root -c "CREATE DATABASE ny_taxi;"

### ----
### Docker Process
docker run -it \
  -e POSTGRES_USER="root" \
  -e POSTGRES_PASSWORD="root" \
  -e POSTGRES_DB="ny_taxi" \
  -v "$(pwd)/ny_taxi_postgres_data:/var/lib/postgresql/data" \
  -p 5433:5432 \
  postgres:13
You can notice that one of the benefits of using Docker is that you can simply set up the container using a single command.
How to Build a Mold (aka Docker Image)?
Prepare the instructions (aka Dockerfile)
For PostgreSQL, we can pull the image from the repo. But in the real development phase, we have our own business logic in the frontend and backend, and it’s also one of the main advantages of using Docker – packaging all the dependencies of your code and easily deploying across different platforms and environments.
Using the example at the beginning of the article, we’ve assumed the frontend application uses React and the backend application uses Python. How can we build their images?
We need the appropriate instructions to build our “mold” (image), which is called Dockerfile in this case:
For the frontend using React, we need to install Node.js (and relevant dependencies). The following is an example Dockerfile for the frontend.
# Use an official Node.js runtime as the base image
FROM node:14-alpine

# Set the working directory in the container
WORKDIR /app

# Copy package files and install dependencies
COPY package.json package-lock.json ./
RUN npm install

# Copy the React app's source code to the docker container
COPY . .

# Expose the default development port (usually 3000)
EXPOSE 3000

# Start the development server with hot reloading
CMD ["npm", "start"]
We can also compare this to the normal process for setting up the same frontend service without using Docker:
### ----
### Normal Process
# Install the Node service
brew install node

# Setting the working directory
# Have the same effect as "copy . ." in the dockerfile since we need all the files the application works from
cd /path/to/your/project/frontend

# Installing dependencies
npm install

# Starting the development server
npm start
And for the backend, we need to install Python and relevant dependencies, and also run our business logic in the run.py.
# Example Dockerfile for Python backend

# Use a slim Python image as the base image
FROM python:3.9-slim

# Set the working directory in the container
WORKDIR /app

# Copy the requirements file to install dependencies
COPY requirements.txt .

# Install Python dependencies
RUN pip install -r requirements.txt

# Copy the application code into the container
COPY . .

# Expose port 5000 for the Flask application
EXPOSE 5000

# Define the command to run the Flask application
CMD ["python", "run.py"]
Build the images using Dockerfile
Assume you have saved the Dockerfile with the name Dockerfile in your frontend directory, and you can run the following command:
docker build -t frontend:latest .
-t frontend:latesttags the image with the name frontend and the tag latest. Just like when you are pulling the image from the repo, you can specify which version usingpython:3.9-slim- The dot
.means the build context is the current directory.
If you have a file with a different name than Dockerfile, you can use -f to specify the name you want to use:
docker build -f Dockerfile.dev -t frontend:dev .
Advanced: Multi-stage builds
We don’t like a single large application, so in Python we can have lots of classes and functions for reusability and also for better debugging.
So in the Dockerfile, we have a similar strategy called multi-stage builds. For example, for the frontend, we can first use Node.js to install dependencies and build the React app. Then, for the final stage, we can use an Nginx image to serve the static files from the build folder. This stage produces a production-ready image.
# Stage 1: Build the React app
FROM node:14-alpine as builder

# Set the working directory in the container
WORKDIR /app

# Copy package files and install dependencies
COPY package.json package-lock.json ./
RUN npm install

# Copy the React app source code
COPY . .

# Build the React app (creates a production-ready build folder)
RUN npm run build
# This step produces static files like HTML, CSS, JS

### ----
# Stage 2: Serve the React app with Nginx
FROM nginx:stable-alpine

# Copy the production build from the builder stage into Nginx's public folder
COPY --from=builder /app/build /usr/share/nginx/html

# Expose port 80 for serving the application
EXPOSE 80

# Start Nginx in the foreground
CMD ["nginx", "-g", "daemon off;"]
What If I Want to Launch Multiple Containers? (aka Docker Compose)
Let’s use the previous example. Now we have a frontend service, a backend service, and PostgreSQL. We need to launch PostgreSQL first, then the backend service, and finally the frontend service.
And again, developers hate repeating themselves, so they always want an easy way to build multiple containers, especially if they have dependencies on each other.
Here comes the Docker Compose function.
We can define the docker-compose.yml file as follows; you can read the comments to understand the logic inside.
version: "3.8"

services:
  frontend:
    # Build the frontend image using the Dockerfile in the 'frontend' folder
    build: ./frontend
    # Map port 3000 in the container to port 3000 on the host
    ports:
      - "3000:3000"
    environment:
      # Let your frontend know where the backend is running.
      - REACT_APP_BACKEND_URL=http://backend:5000
    depends_on:
      # Ensure the backend service is running before the frontend
      - backend

  backend:
    build: ./backend
    ports:
      - "5000:5000"
    environment:
      # Example of passing database connection info to your backend; adjust if needed.
      - DATABASE_URL=postgresql://root:root@db:5432/ny_taxi
    depends_on:
      # Ensure the database is running before starting the backend
      - db

  db:
    image: postgres:13
    environment:
      - POSTGRES_USER=root
      - POSTGRES_PASSWORD=root
      - POSTGRES_DB=ny_taxi
    volumes:
      - ./ny_taxi_postgres_data:/var/lib/postgresql/data
    ports:
      - "5433:5432"
In the folder that contains this YAML file, you can run docker-compose up --build and also use docker-compose down to stop these containers.
Of course, you can define more details in the YAML file:
services:
    # Define containers
networks:
    # Define networks
volumes:
    # Define volumes of containers
configs:
    # Define configuration details
secrets:
    # Define tokens, passwords.
Refer to the Docker Compose documentation for more info.
How Do Containers Communicate with Each Other (aka Docker Network)
Understanding Default Bridge Network
Note: This part is based on my personal understanding of the following video: Docker networking is CRAZY
Docker supports different network types, and the default (and most commonly used) one is the bridge driver. It’s similar to a physical bridge that connects separate networks; the bridge network connects individual containers to a central hub (a virtual interface in Docker’s case).
When you create a container without specifying a network (e.g. docker run <image_name>), Docker uses the default bridge network called docker0 (shown in the blue circle on the left). By default, containers on this network receive an IP address in the 172.17.0.0/16 subnet.
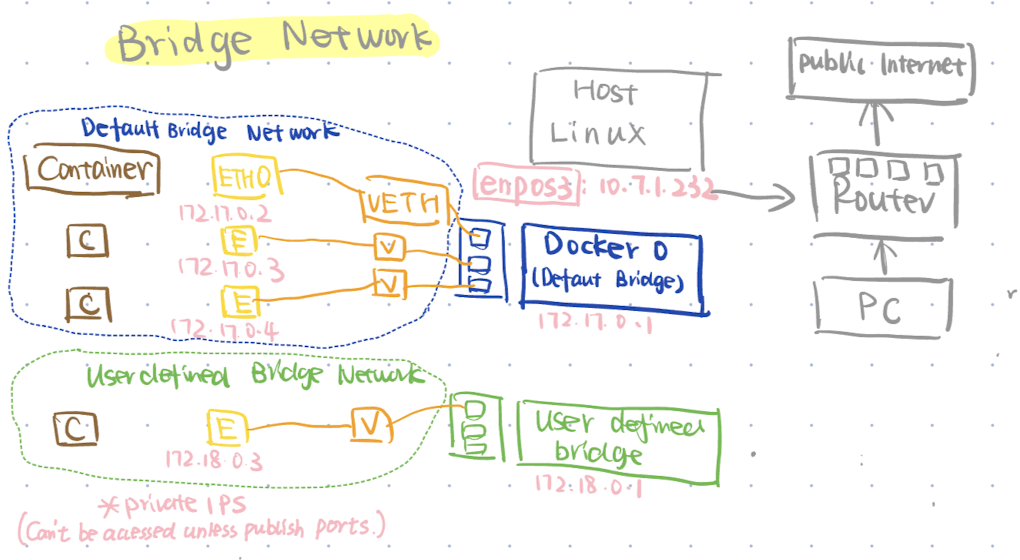
To connect a container to the bridge, Docker creates a virtual Ethernet (veth) pair: one end exists in the host’s namespace (often named veth*) and the other end appears inside the container as eth0. On the host side, this veth interface is attached to the docker0 bridge, which typically has its own IP address (e.g., 172.17.0.1).
To clarify these concepts:
- eth0 refers to the container’s network interface within its own namespace.
- vethX refers to the corresponding virtual Ethernet interface in the host’s network namespace.
Using an analogy, think of the host machine as an entire building, where the container is an apartment. The host namespace acts like the building’s lobby, seeing and managing all apartments, while the container’s namespace functions like the apartment’s walls, creating a private environment.
Even though Docker runs on the host machine and your PC is on the same router, it’s not possible to connect directly to a container using its private IP address (e.g., 172.17.0.2).
To allow external services to access the container, you need to publish ports. For example, you can map port 8080 on the host to port 80 in the container by using the command -p 8080:80 when starting the container.
Create Your Own Network
As mentioned earlier, there is a default bridge network, and we can also define a user-defined network, like the green circle on the bottom left.
You can also define a custom range for the subnet and gateway.
docker network create \
  --driver bridge \
  --subnet 192.168.100.0/24 \
  --gateway 192.168.100.1 \
  user_defined_bridge_network
And you can specify the container to connect to this network by using the following command:
## When starting the container
docker run --network user_defined_bridge_network

## Later connecting to the network
docker network connect <networkname> <container>
Just as containers support docker container ls and docker container inspect <container_id>, you can also use docker network ls and docker network inspect <network_id> to check the configuration of your network.
Want to Learn More?
If you are completely new to Docker, I recommend you watch these videos from IBM Cloud,
- Virtualization Explained
- Containers vs VMs: What’s the difference?
- Containerization Explained
- Virtual Machine (VM) vs Docker*
These videos provide a high-level explanation of virtualization and Docker, which will better prepare you to dive into the details.
I’ve followed DE Zoomcamp Week 1: Docker Terraform to learn the basics of Docker, so I skipped the introductory course. But I think it might be more helpful if you start with DataCamp’s Introduction to Docker and DataCamp’s Intermediate Docker.
And if you get stuck, refer to the official Docker documentation and search for keywords on YouTube (that’s how I found the useful Docker network explanation).
Have fun learning Docker!