Data Engineering Components: Kubernetes Explained
Note: Kubernetes is a tool for orchestrating Docker containers. If you’re not familiar with Docker, I recommend you read this article first.
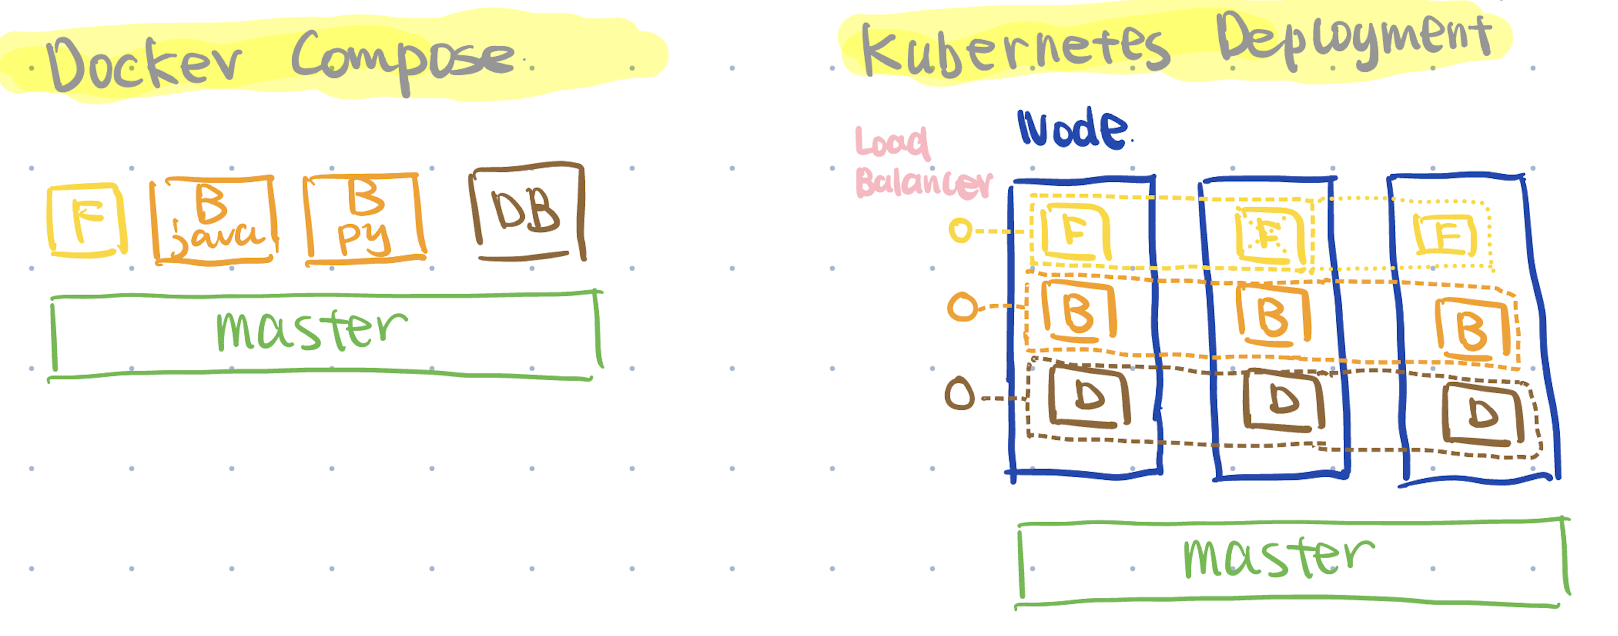
Assume we have three Docker containers: frontend (React), backend (Python), and database.
We can use docker compose to manage dependencies among these containers. For example, we can specify that the backend container should start after the database container.
version: "3.8"

services:
  frontend:
    # Build the frontend image using the Dockerfile in the 'frontend' folder
    build: ./frontend
    # Map port 3000 in the container to port 3000 on the host
    ports:
      - "3000:3000"
    environment:
      # Let your frontend know where the backend is running.
      - REACT_APP_BACKEND_URL=http://backend:5000
    depends_on:
      # Ensure the backend service is running before the frontend
      - backend

  backend:
    build: ./backend
    ports:
      - "5000:5000"
    environment:
      # Example of passing database connection info to your backend; adjust if needed.
      - DATABASE_URL=postgresql://root:root@db:5432/ny_taxi
    depends_on:
      # Ensure the database is running before starting the backend
      - db

  db:
    image: postgres:13
    environment:
      - POSTGRES_USER=root
      - POSTGRES_PASSWORD=root
      - POSTGRES_DB=ny_taxi
    volumes:
      - ./ny_taxi_postgres_data:/var/lib/postgresql/data
    ports:
      - "5433:5432"
However, there is still an issue: what if the business grows and we want to scale up the number of containers to handle increased requests?
Using docker compose, we’d have to manually manage container scaling.
As we’ve discussed before, developers won’t like repetitive tasks. They prefer describing the desired state (refer to the declarative approach explained in the Infrastructure as Code section) and letting tools handle container deployment and management.
This is where Kubernetes (also called K8s, since there are eight letters between ‘K’ and ‘S’) comes in.
Benefits of Using Kubernetes vs. Docker Compose
Note: This part is based on my personal understanding of this video: Container Orchestration Explained
- Deployment Management:
- Scheduling: K8s has a scheduler in its super brain, which automatically finds suitable nodes with enough resources to run pods, making sure workloads are efficiently distributed across the cluster.
- Auto Scaling: When certain features are enabled and if you request too many pods, K8s can add new nodes by sending requests to your cloud provider to run these pods.
- Automated Recovery: If certain containers go down, K8s has self-healing abilities and automatically launches new containers.
- vs. Docker Compose: Docker Compose is used to run multi-container Docker applications directly on a single host, meaning it only utilizes OS resources and does not support advanced orchestration features provided by K8s.
- Networking:
- Internal Networking: Every pod in Kubernetes gets its own IP address, and a specific service (via ClusterIP) can be accessed by other internal services using the cluster IP.
- External Access: Kubernetes can expose services to the outside world using services like Load Balancer, which can distribute external traffic across healthy pods.
- Insights:
- K8s can integrate with tools such as Prometheus for detailed logging and analytics, and Istio to provide insights into how microservices interact.
Kubernetes Architecture
Note: This part is based on my personal understanding of this video: Kubernetes Explained

Developer Side: Define the Desired State
In the first stage, developers describe the desired state and relevant settings in a configuration file, which Kubernetes calls a manifest.
Generally, we define the Deployment section—such as how the application should run, the number of replicas (pods) to maintain, the container images to use, and update strategies.
In this example, we define a pod template with two containers labeled app: frontend, and we specify that we need three replicas of this pod.
apiVersion: apps/v1
kind: Deployment
metadata:
  name: example-deployment
spec:
  # Create three pods labeled app: frontend
  replicas: 3
  selector:
    matchLabels:
      app: frontend
  template:
    metadata:
      labels:
        app: frontend
    spec:
      containers:
      # Only run multiple containers in one pod when the containers are tightly coupled
      # Example: Running two containers in one pod
      - name: nginx
        image: nginx:latest
      - name: nodejs
        image: node:latest
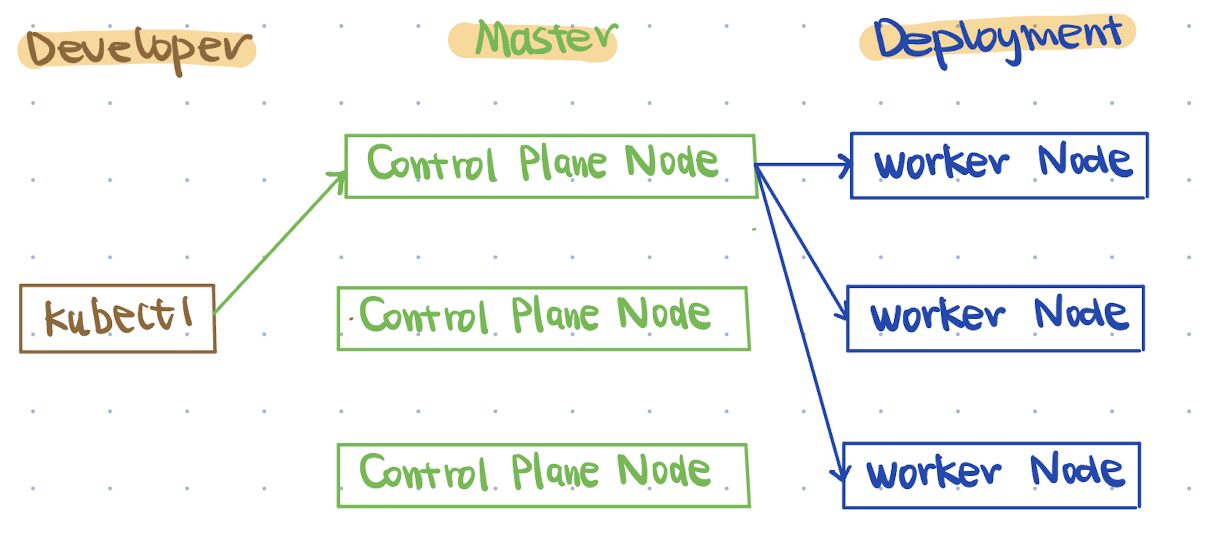
Once the manifest file is ready, we use another component called kubectl, whose primary role is reading the manifest and sending requests to the control plane (K8s master) through an API.
To use kubectl, we typically run: kubectl apply -f <manifest_filename> (other commands will be discussed later).
Control Plane: The Kubernetes Master (“Super Brain”)
The super brain is mainly responsible for ensuring the actual state on the deployment side equals the desired state from the developer side.
In the previous step, kubectl processes requests by reading the manifest and sends these requests to the API server in the control plane.
The API server records the desired state, such as having 3 pods, into etcd, a key-value store for the cluster.
Next is the controller manager, responsible for managing controllers such as nodes, services, and replica sets. It also interacts with cloud provider APIs, enabling easy provisioning of services like load balancers or persistent storage.
The scheduler continuously monitors etcd (via the API server) for new pods that haven’t been assigned to nodes yet. It evaluates available resources and assigns pods to appropriate nodes.
The scheduler also sends back requests to the API server to trigger deployment.
Advanced: Highly Available Control Plane Nodes
In the production environment, we can set multiple control plane nodes to avoid potential failures. The kubectl sends requests to one of the control plane nodes using the load balancer.
The selected control plane node internally processes the requests using API server, etcd, etc., and manages all the worker nodes in the deployment side.
Deployment
On the deployment side, there’s a component acting like a “doorman” called kubelet, constantly watching the API server.
When changes are detected and commands are received, the kubelet runs pods according to the manifest, such as pulling the specified images.
After containers start successfully, kubelet reports back to the API server, indicating pods are now in the “Running” state, allowing etcd to update the cluster state.
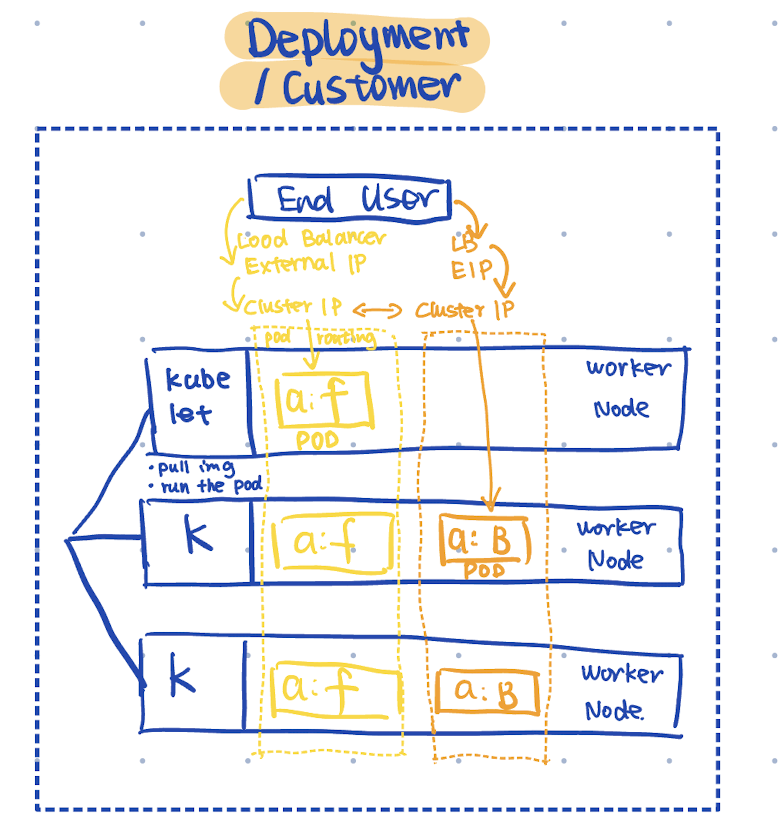
In the diagram, the three pods share the selector app: frontend (shown as a:f), forming a service within Kubernetes.
While pods themselves are ephemeral and can be stopped and recreated at any time, the services are not ephemeral. They remain consistent and expose network connectivity.
Internally, the frontend service interacts with the backend cluster via the cluster IP.
If we want to distribute traffic among containers, we can add the following configuration in the manifests.yaml:
apiVersion: v1
kind: Service
metadata:
  name: frontend-service
spec:
  type: LoadBalancer
  selector:
    app: frontend
  ports:
  - protocol: TCP
    port: 80
    targetPort: 80
This way, external users can access the frontend cluster by sending requests to the load balancer’s external IP. The load balancer then forwards those requests from its external IP address to the frontend cluster.
Hands-on K8S
Write Your Own Manifests
In the beginning of the manifest, we can define the kind. There are some common kinds we need to define, including the app type, networking, and storage.
Workloads: Deployment vs. StatefulSet
Generally, there are two types of workloads.
- Deployment: which means they are stateless apps, like a search engine. No matter how many pods you specify, K8s will create them at once, and a random identifier will be assigned by K8s.
- StatefulSet: which corresponds to stateful apps, like a database backend. Pods are created sequentially, e.g., pod-0, pod-1, pod-2, and when scaling down, the pods created later will be deleted first.
apiVersion: apps/v1
kind: Deployment
or
apiVersion: apps/v1
kind: StatefulSet
After defining the kind, we need to define relevant features of the Deployment or the StatefulSet:
apiVersion: apps/v1
kind: Deployment
metadata:
  name: example-deployment
  labels:
    # Can be different from the other two
    # Usage: kubectl get deployments -l app=frontend
    app: frontend
    env: production
spec:
  replicas: 3
  selector:
    # Must be a subset of spec.template.metadata.labels
    # Used internally by the K8s control plane
    matchLabels:
      app: frontend
      env: production
  template:
    metadata:
      # Used together with spec.selector.matchLabels by the K8s control plane
      # Usage: kubectl get pods -l version=v1
      labels:
        app: frontend
        env: production
        version: v1
    spec:
      containers:
      - name: mycontainer
        image: myimage:latest
        ports:
        - containerPort: 80
It might be confusing with lots of labels coming along. The key to remember is that the Deployment’s selector (defined in spec.selector.matchLabels) must match a subset of the pod’s labels (in spec.template.metadata.labels).
The K8s control plane (controller in detail) uses the labels defined in spec.selector.matchLabels together with the labels in spec.template.metadata.labels to determine which pods it should manage.
Here are the differences explained in detail:
- Deployment Metadata Labels: Not used for pod management; mainly for Deployment management and organization. You can use them like
kubectl get deployments -l app=frontendto filter relevant deployments. - Selector Labels: Internally used by the Kubernetes control plane to define which Pods the controller should manage; must be a subset of the Pod Template Labels.
- Pod Template Labels: Used to manage Pod labels and also by the control plane. You can use them like
kubectl get pods -l version=v1to filter relevant pods.
Networking: LoadBalancer vs. Ingress
As we define labels for pods in the Pod Template (spec.template.metadata.labels), we can also group the pods with a certain selector in a Service.
The following code snippet shows an example of a load balancer service:
apiVersion: v1
kind: Service
metadata:
  name: my-loadbalancer-service
spec:
  # Select pods based on spec.template.metadata.labels
  selector:
    app: frontend
  ports:
    - protocol: TCP
      port: 80
      targetPort: 8080
  type: LoadBalancer
The LoadBalancer type tells Kubernetes to provision an external load balancer. This makes the Service accessible from outside the cluster (using the external IP of LoadBalancer). Then, traffic coming to the Service on port 80 is forwarded to the target port 8080 on the selected Pods, using the TCP protocol.
However, when you have multiple services, you need to create a separate load balancer per service, which may result in extra costs.
So in K8s, you can use another service named Ingress to better handle external HTTP and HTTPS requests based on the paths. In this case, we usually put another load balancer in front of the Ingress, and the Ingress can divide and route traffic to relevant backend services based on defined rules.
The following code snippet shows how we define the routing rules to relevant backend services.
In detail:
- Resolve user requests: When the user types “app.com” in their browser, the DNS will resolve the domain to the IP address of the external load balancer.
- Forward traffic to the Ingress controller pod: We can define a set of rules in the Ingress; for example, the requests to
servicea.app.comshould be forwarded toservice-a. In this case, the request uses the internal cluster IP of the relevant service.
# Part 1: Ingress Controller Service
# Add the load balancer in front of the Ingress controller
apiVersion: v1
kind: Service
metadata:
  name: ingress-nginx
  namespace: ingress-nginx
spec:
  type: LoadBalancer
  selector:
    app.kubernetes.io/name: ingress-nginx
  ports:
    - name: http
      port: 80
      targetPort: http
    - name: https
      port: 443
      targetPort: https

----
# Part 2: Ingress routing rules
apiVersion: networking.k8s.io/v1
kind: Ingress
metadata:
  name: my-ingress
  annotations:
    nginx.ingress.kubernetes.io/rewrite-target: /
spec:
  rules:
    # Rule for Service A
    - host: servicea.app.com
      http:
        paths:
          - path: /
            pathType: Prefix
            backend:
              service:
                name: service-a
                port:
                  number: 80
    # Rule for Service B
    - host: serviceb.app.com
      http:
        paths:
          - path: /
            pathType: Prefix
            backend:
              service:
                name: service-b
                port:
                  number: 80
You can also check this short video to have an introductory overview of the K8s network.
Storage: Persistent Volume, Persistent Volume Claim and Storage Class
As we listed in the workloads section, Kubernetes supports StatefulSets, which means that the relevant data should be persistent. Kubernetes allows you to attach external storage to pods.
If you are familiar with AWS, think of it as attaching an AWS EBS volume to an EC2 instance. Even if the EC2 instance is stopped or terminated, the data on the EBS volume remains persistent and can be reattached or reallocated when needed.
Unlike EBS, which is attached directly to an EC2 instance, Kubernetes creates an additional layer on top of the pod (which is like the end consumer of the storage) called a PersistentVolumeClaim (PVC) .
A PVC can be derived from a predefined PersistentVolume (PV), where you specify the storage location directly, or from a StorageClass (SC), where Kubernetes handles the interaction with the actual storage and creates the PV behind the scenes.
The first approach is called Static Provisioning, while the second one is known as Dynamic Provisioning. The following are detailed explanations:
1. Static Provisioning: PersistentVolume (PV) + PersistentVolumeClaim (PVC)
 Page Source: Persistent storage for Kubernetes
In this approach, we create a PV that defines the actual storage. Then, we create a PVC that binds to the predefined PV.
# Define PV
apiVersion: v1
kind: PersistentVolume
metadata:
  name: static-pv
spec:
  capacity:
    storage: 5Gi
  accessModes:
    - ReadWriteMany
  persistentVolumeReclaimPolicy: Retain
  hostPath:
    path: "/mnt/data"
  storageClassName: ""

---
# Define PVC
apiVersion: v1
kind: PersistentVolumeClaim
metadata:
  name: static-pvc
spec:
  accessModes:
    - ReadWriteOnce
  resources:
    requests:
      storage: 5Gi
  volumeName: static-pv
  storageClassName: ""
2. Dynamic Provisioning: StorageClass (SC) + PersistentVolumeClaim (PVC)
 Page Source: Persistent storage for Kubernetes
In this approach, we define a StorageClass to specify the provisioner and parameters for dynamic storage provisioning. Then, we create a PVC that references the StorageClass. K8s uses the StorageClass to automatically create a PV that meets the PVC request and binds them together.
# Define SC
kind: StorageClass
apiVersion: storage.k8s.io/v1
metadata:
  name: efs-sc
provisioner: efs.csi.aws.com
parameters:
  provisioningMode: efs-ap
  fileSystemId: fs-92107410
  directoryPerms: "700"
---
# Define PVC
apiVersion: v1
kind: PersistentVolumeClaim
metadata:
  name: sc-pvc
spec:
  accessModes:
    - ReadWriteMany
  resources:
    requests:
      storage: 5Gi
  storageClassName: "efs-sc"
With these two volumes created, we can attach them to a single pod. All pods created by the Deployment will share these two PVC.
apiVersion: apps/v1
kind: Deployment  # or StatefulSet for stateful applications
metadata:
  name: example-deployment
  labels:
    app: frontend
    env: production
spec:
  replicas: 3
  selector:
    matchLabels:
      app: frontend
      env: production
  template:
    metadata:
      labels:
        app: frontend
        env: production
        version: v1
    spec:
      volumes:
      - name: sc-storage
        persistentVolumeClaim:
          claimName: sc-pvc
      - name: static-storage
        persistentVolumeClaim:
          claimName: static-pvc
      containers:
      - name: mycontainer
        image: myimage:latest
        ports:
        - containerPort: 80
        volumeMounts:
        # Mount for the PVC from the storage class
        - name: sc-storage
          mountPath: "/usr/share/nginx/html/sc"
        # Mount for the PVC from the static PV
        - name: static-storage
          mountPath: "/usr/share/nginx/html/static"
Advanced: Single Attach vs. Multi Attach
If multiple pods are needed in our deployment and they may need to write and read simultaneously, we cannot mount a single PVC with a ReadWriteOnce setting if the pods might be scheduled on different nodes. This is because ReadWriteOnce means that the volume allows only one node to read and write at a time.
apiVersion: v1
kind: PersistentVolumeClaim
metadata:
  name: sc-pvc
spec:
  accessModes:
    - ReadWriteMany
  resources:
    requests:
      storage: 5Gi
  storageClassName: "efs-sc"
Explanation of three types of accessModes:
- ReadWriteOnce (RWO): Can be mounted as read-write by a single node.
- ReadWriteMany (RWX): Can be mounted as read-write by many nodes.
- ReadOnlyMany (ROX): Can be mounted as read-only by many nodes.
So, we should be careful when selecting the backend storage system. For example, AWS EBS mainly supports single attach (which means it should only be attached to a single consumer), while AWS EFS natively supports multi attach.
Note: In AWS, the multi-attach feature is available on specific volume types, such as high-performance storage types io1/io2. For more information on how to use an AWS EBS volume in Kubernetes, check this documentation.
Also, as you may remember, for a StatefulSet each pod gets a unique identifier in sequential order. With volumeClaimTemplates, each pod will also get its own unique PVC, and the PVC names are generated based on the template name service name and the pod’s ordinal.
In the following code snippet, for the first pod (ordinal 0), the first PVC based on the storage class will be sc-storage-example-statefulset-0 and the second PVC derived from the static PVC will be static-storage-example-statefulset-0.
apiVersion: apps/v1
kind: StatefulSet
metadata:
  name: example-statefulset
  labels:
    app: frontend
    env: production
spec:
  # ServiceName is required for stable network identities
  serviceName: "example"
  replicas: 3
  selector:
    matchLabels:
      app: frontend
      env: production
  template:
    metadata:
      labels:
        app: frontend
        env: production
        version: v1
    spec:
      containers:
      - name: mycontainer
        image: myimage:latest
        ports:
        - containerPort: 80
        volumeMounts:
          - name: sc-storage
            mountPath: "/usr/share/nginx/html/sc"
          - name: static-storage
            mountPath: "/usr/share/nginx/html/static"
  volumeClaimTemplates:
  - metadata:
      name: sc-storage
    spec:
      accessModes: ["ReadWriteOnce"]
      # For dynamic provisioning
      storageClassName: "io1-storage"
      resources:
        requests:
          storage: 5Gi
  - metadata:
      name: static-storage
    spec:
      accessModes: ["ReadWriteOnce"]
      # For a static PV
      storageClassName: ""
      resources:
        requests:
          storage: 5Gi
Apply Changes Using kubectl

There are three major categories of kubectl commands:
- Start the pods or update the pods
kubectl apply -f <manifest.yml> - Scale up and down the number of pods
kubectl scale deployment/statefulset <name> --replicas <number> - Monitor services
kubectl get/describe services/pods/pv/pvc/sc <name>
Want to Learn More?
If you have a basic understanding of Docker, you can first watch this video Container Orchestration Explained to understand why we’d rather use Kubernetes, not Docker Compose, for container orchestration.
Then, I recommend watching Kubernetes Explained for a high-level understanding of Kubernetes.
If you are interested in the architecture part, you can also check out these videos:
Then, to get hands-on experience, you can follow this course from DataCamp: Introduction to Kubernetes.
- For the storage section, I found that the article Persistent storage for Kubernetes explains the necessary concepts clearly.
Have fun learning Kubernetes!